
Draft for Anaya’s Beauty review : not for publication
Meta description: Learn how to size and apply 24-piece press-on nails, choose between jelly tabs and liquid glue, and create Y2K glam looks with pink rhinestone and gold chrome styles.
Suggested SEO URL: /blogs/wig-tips-tutorials/press-on-nails-101
Press-on nails make it easy to create a polished manicure without booking an appointment. With the right size, careful preparation, and an application method that fits your routine, you can enjoy a professional-inspired look in minutes.
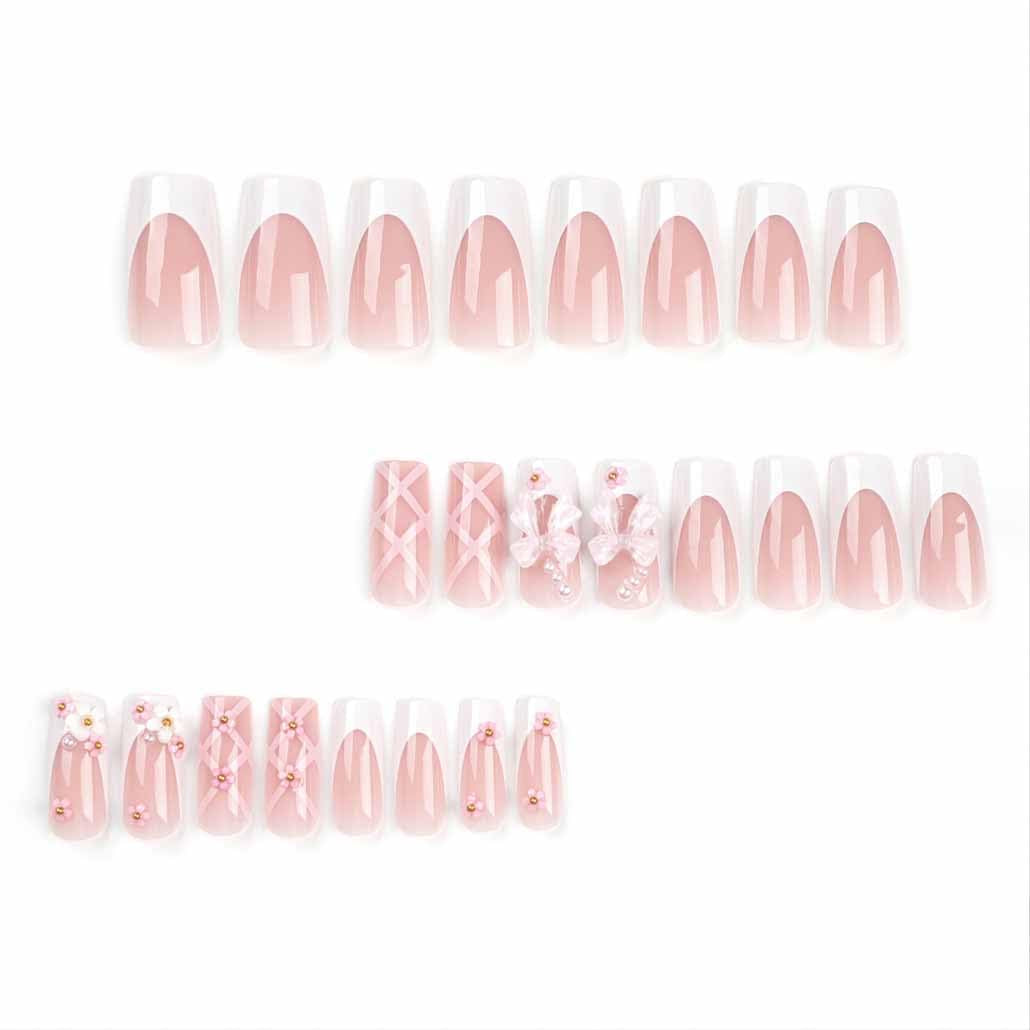
Whether you love soft pink rhinestones or bold gold chrome details, press-ons are also a fun way to express your beauty style. At Anaya’s Beauty, two standout options bring instant glam to your fingertips: the Medium-Long Pink Rhinestone Press-Ons, listed at $47.90, and the Long Square Gold 3D Chrome Y2K Star Press-Ons, listed at $48.38.
Here’s everything you need to know before your next press-on manicure.
What Comes in a 24-Piece Press-On Nail Set?
A 24-piece set includes nail tips in 12 different sizes. This gives you more flexibility than a limited-size set, especially if your thumbs, middle fingers, or pinkies have noticeably different nail widths.
The goal is not to use the first ten nails you see. Instead, you will match each press-on to the natural nail it covers best.
A properly sized nail should:
- Cover your natural nail from sidewall to sidewall
- Sit neatly above the cuticle without touching the surrounding skin
- Avoid pinching or creating pressure at the sides
- Look centered and balanced on the nail
If you are between sizes, choose the slightly larger press-on and gently file the sidewalls until it fits. It is usually easier to customize a nail that is a little wide than to make a nail that is too small work.
How to Size Your Press-Ons
Before applying anything, lay all 24 nails on a clean surface. If the sizes are numbered, organize them from largest to smallest. Numbering systems can vary by brand, so always focus on the actual fit rather than assuming a number will match a previous set.
For each finger:
- Hold a press-on over your natural nail without applying adhesive.
- Check that both sidewalls are covered.
- Make sure the press-on does not overlap onto your skin.
- Compare a few sizes if you are unsure.
- Set aside the ten nails you plan to use in application order.
You can also measure your nails in millimeters at the widest point and compare those measurements with a brand’s chart when one is available. A transparent tape method works well: place a thin piece of tape across the widest part of the nail, mark each sidewall, then measure the distance between the marks on a flat surface.
Do not skip this step. Correct sizing is one of the biggest differences between a manicure that looks seamless and one that lifts or feels uncomfortable.
Prepare Your Natural Nails First
Good preparation helps adhesive bond to the natural nail. It also creates a smoother foundation for the press-ons.
Before application, gather:
- Your selected press-on nails
- A nail file or buffer
- A cuticle pusher
- Alcohol or a nail cleanser
- Jelly adhesive tabs or liquid nail glue
- A clean, dry work surface
Anaya’s Nail Care collection includes manicure essentials such as the 10-piece double-sided emery nail file set.
Step-by-Step Nail Preparation
-
Remove existing product.
Natural nails should be free of polish, gel, acrylic, oil, and residue. -
Wash and dry your hands.
Make sure your nails are completely dry before moving to the next step. -
Shape the natural nails.
Trim or file the free edge so it does not extend beyond the press-on. -
Gently push back the cuticles.
Work carefully and avoid cutting or irritating the skin. -
Lightly buff the nail surface.
Use gentle pressure to remove shine. Over-buffing can thin or weaken the natural nail. -
Clean each nail with alcohol.
This removes dust and leftover oils. Allow the nail plate to air-dry fully.
For a helpful visual reference, review this press-on application and measuring guide, which also explains measuring in millimeters and holding each nail in place during application.
Jelly Tabs or Liquid Glue: Which Should You Choose?
The best adhesive depends on how long you want to wear your manicure and how often you like to change your style.
Jelly Glue Tabs
Jelly tabs are thin adhesive stickers placed directly on the natural nail. They are a convenient option for temporary wear, special events, photos, or anyone who likes to switch designs often.
Benefits include:
- Quick, clean application
- Easy removal when softened properly
- A good option for short-term wear
- Less commitment when testing a new length or shape
The Medium-Long Pink Rhinestone Press-Ons include 24 nail tips, a nail file, and 36 jelly adhesive pieces according to the product listing. The set is designed for an easy at-home manicure and is listed as lasting up to approximately 14 days, depending on application and daily activities.
To apply jelly tabs, place the correct tab on the natural nail, smooth out air bubbles, remove the protective film, and press the press-on firmly into place for about 15–30 seconds.
Liquid Nail Glue
Liquid glue is generally preferred when you want a stronger bond and longer wear. Apply a small, even amount to the natural nail and avoid flooding the cuticle or surrounding skin.
To apply:
- Place a thin layer of glue over the natural nail.
- Add a small amount inside the press-on if needed.
- Align the press-on at the cuticle area.
- Press down firmly over the entire nail for about 30 seconds.
- Repeat on the remaining fingers.
The Long Square Gold 3D Chrome Y2K Star Press-Ons include 24 tips across 12 sizes and one nail glue for DIY application. The long square shape, gold texture, chrome finish, and star-inspired details create a statement manicure for parties, celebrations, photos, and everyday glam moments.
Avoid water for the first two to three hours after liquid-glue application whenever possible. Applying your nails in the evening can give the adhesive more time to set before you begin normal activities.

How to Create a Y2K Glam Manicure
Y2K beauty is all about playful shine, glossy finishes, rhinestones, chrome, and details that feel nostalgic but current. Press-on nails make it easy to try the trend without committing to one design for weeks.
Soft Pink Rhinestone Glam
The Medium-Long Pink Rhinestone Press-Ons are ideal when you want a feminine, polished look with plenty of sparkle. Coordinate them with:
- A soft pink or neutral wig
- Glossy lip color and luminous makeup
- Pearl or crystal beauty accessories
- A sleek bob, loose curls, or soft waves
The medium-long length offers noticeable glam while remaining a little more versatile for daily routines than an extra-long style.
Gold Chrome Star Glam
For a bolder Y2K moment, choose the Long Square Gold 3D Chrome Y2K Star Press-Ons. The gold and chrome finish pairs beautifully with:
- Black, espresso, or deep brown wigs
- Blonde styles with warm or golden tones
- Sleek straight hair or sculpted waves
- Gold-toned beauty accessories
- Shimmering eye makeup and glossy lips
When your nails are the statement, let one element lead. If you are wearing a highly detailed manicure, choose a wig with a clean silhouette, such as a polished bob, defined curls, or a smooth glueless style.
Match the Mood, Not Every Detail
Your manicure does not have to match your wig exactly. Instead, coordinate through color, finish, or energy.
Try these combinations:
- Pink rhinestones + curly black wig: soft glam with romantic sparkle
- Gold chrome + honey blonde wig: warm, luminous glamour
- Pink and white details + straight bob: clean, feminine polish
- Gold stars + deep wave wig: high-impact evening beauty
- Chrome accents + braided wig: modern texture with a futuristic finish
Explore Anaya’s wig collection for styles that can complement your manicure, from short pixie cuts to long lace-front looks.

Press-On Nail Care Tips
Once your manicure is applied, a few simple habits can help protect the tips and your natural nails.
- Use your fingertips rather than your nails to open containers.
- Avoid soaking your hands for long periods.
- Wear gloves when working with cleaning products or extended water exposure.
- Keep oils and heavy creams away from the adhesive area during the first few hours.
- File a rough edge gently instead of pulling at it.
- Do not use press-ons to pry, scrape, or lift objects.
When it is time to remove the set, do not pop or force the nails off. Soak them in warm, soapy water and gently loosen the edges. For glue-applied nails, cuticle oil can help soften the adhesive. If a nail does not release easily, continue soaking rather than prying.
If you experience redness, swelling, pain, or irritation, discontinue use and allow your natural nails and surrounding skin to recover.
Your At-Home Glam Starts Here
Press-on nails are a simple way to make your beauty routine feel more expressive. With 24 tips across 12 sizes, careful prep, and the right adhesive, you can create a manicure that looks intentional and feels comfortable.
Choose the Medium-Long Pink Rhinestone Press-Ons for soft, sparkling femininity, or make a statement with the Long Square Gold 3D Chrome Y2K Star Press-Ons. Then complete your look with a wig and beauty accessories from Anaya’s Beauty.
Shop the Nail Care collection and find your next confidence-boosting manicure at Anaya-k.com.
0 comments